Beyond console.log(): 8 Console Methods for Debugging JS & Node
Improve your JavaScript and Node debugging with these 8 powerful console methods beyond console.log(). Learn how to use console.assert(), console.table(), and more to find bugs faster.

The Console API
Every JavaScript developer has used console.log(‘text’). The console module is one of the most common utilities in JavaScript, and the API implemented in Node:
This is the definition written in the Node.js documentation page for the Console module 😅. However, beginners are prone to consult online tutorials instead of reading the documentation while starting with new technologies, missing the chance to learn how to properly use this new tool to 100% of its potential.
When talking about the Console API, newbies usually use only some functions like 👌console.log(), ⚠️ console.warn(), or ❌ console.error() to debug their application, while often there are many other methods which can perfectly implement our requirements and improve debugging efficiency.
This article is made to expose some of the most interesting console methods with related examples that I use while teaching at Codeworks. So let’s see a list of the 8 best functions from the Console module!
All the following methods are available in the global instance **console**, so it is not necessary to require the console module.
console.assert
The console.assert function is used to test if the passed argument is a truthy or falsy value. In the case that the passed value is false, the function logs the extra arguments passed after the first one, otherwise, the code execution proceeds without any log.
The assert method is particularly useful whenever you want to check the existence of values while keeping the console clean (avoid logging a long list of properties, etc.).
console.count
These two methods are used to set and clear a counter of how many times a particular string gets logged in the console:
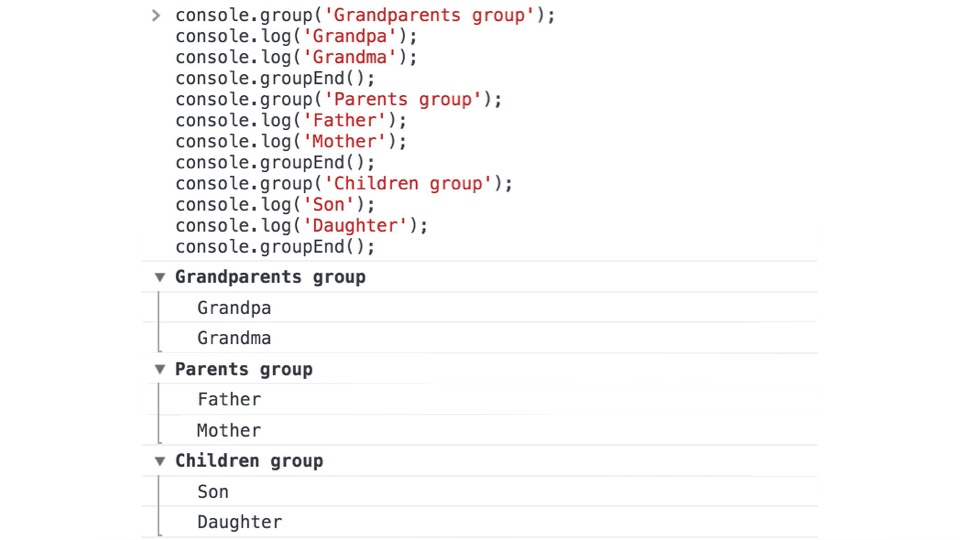
console.group and console.groupEnd
.group and .groupEnd create and end a group of logs in your console. You can pass a label as the first argument of .group() to describe what it is concerned about:

console.table 📋
This particular method is incredibly useful to describe an object or array's content in a human-friendly table:
console.table makes it easier for the inspection and logging of nested and complex arrays/objects.
console.time and console.timeEnd
In the case that you want to check the performance of your code in execution time, and to solve it you create a start timestamp with the Date API and use it to compute the difference after your code execution. Something like this:
Well, using the time and timeEnd functions, it is not necessary to do this trick. You can create your timing report simply by doing:
Summary
With only 3 minutes of your time, you now have a larger scope of some of the wonderful tools available in the Console API. Integrate them with your debugging habits and your development speed will increase exponentially!
Last updated:


