How to Setup Your Redux Store for a High-Performing React Application
Learn how to set up your Redux store for a high-performing React application with this step-by-step guide. Discover the best practices for configuring and optimizing your Redux store to boost your app's performance.

While working on a React application, often we end up with the need to introduce a state manager into the project to help us to manage all the states and to easily share data across the app.
Usually, a good candidate is Redux. It is a powerful and flexible option to manage your global state and centralize most of your data logic.
“Redux is a predictable state container for JavaScript apps.”
But when adding Redux to your React app, are you sure you did it properly? Here we’ll see how to integrate it into our app following a good file structure and configuration setup. Let’s start!
The store skeleton.
Before starting looking at the code, let’s define together how we want to organize the files and integrate it into the React codebase.
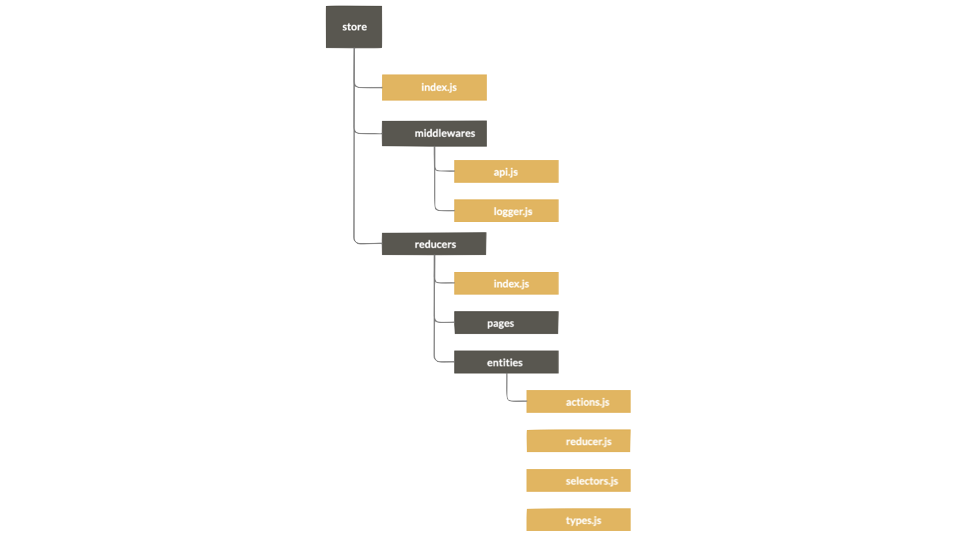
The general idea is to create a store directory that will contain all our logic and store configuration so that we can simply import our store setup and pass it to a Provider in our app.

- Create the store folder into the MyApp/src.
- Create an index.js file to export our store creator. Also, add two folders: middlewares and reducers.
- Within the middlewares folder, create a file for each Redux middleware (e.g. api, logger).
- Within the reducers folder, create an index.js file to combine together all the reducers. Also, add a folder for each reducer.
- For each reducer folder, create four files:
- actions.js: contains the action creators for actions related to this reducer.
- reducer.js: contains the reducer function.
- selectors.js: contains the state selectors.
- types.js: contains the actions’ type definition.
Add the first reducer.
Since every app is different and you could need different states, for simplicity I’ll write the well-known Counter example.
Combine your reducers.
If your app is pretty simple and you only work with a single reducer function you may not need to combine them, but in case you defined multiple reducers functions, it is good to require them and combine them all together using the **combineReducers** function provided by the Redux package:
As you can notice, the combination of our reducers is what will be imported in case we require the reducers folder.
Middlewares or not middlewares?
The focus of this exercise is not on middlewares implementation, so I’ll assume you know how they work and what is their role in a store, but I promise I will also create a guide on their implementation 🚀
Finally, the store configuration.
Now that we have reducers and middlewares ready, its time to create our redux store creator — a function that allows us to create a new store with some optional parameters:
To recap what’s happening in this file:
- We create a list of must-have middlewares.
- If in development mode, we apply an extra configuration, such as the logger middleware.
- We define (and export!) a
configureStorefunction which creates a new store and, based on options received as an argument, set an initial state and optionally caches the state.
Summary
Well, dear readers, now you can import from your store folder a function able to create your store easily, and in case you need to expand your state with new logic you have a template-by-feature easy to follow and work on!
Last updated:


